Category: Professional Cleaning Services

How to Deep Clean Your Air Fryer When the Grease Has Become Geological

25/03/2026 By Jo Off

At some point between the first batch of chips and the forty-seventh round of halloumi, something changes in your air fryer. The grease that was once a light, manageable residue has quietly, patiently, over weeks and months of 200-degree heat, transformed into something else entirely. Something amber-coloured and ancient. Something that has formed layers. You find yourself staring into the basket wondering whether what you’re looking at is technically a sedimentary deposit, and whether it predates your current relationship.

You are not being dramatic. Air fryer grease really does behave differently to ordinary cooking residue – and once it crosses a certain threshold, a quick rinse under the tap is no longer going to cut it. The good news is that even genuinely geological grease is no match for the right approach. The better news is that you almost certainly have everything you need already. Here’s how to bring your air fryer back from the brink.


Why Air Fryer Grease Gets So Stubbornly, Magnificently Awful

Understanding the enemy is half the battle – or at least, it makes you feel better about the state of things.

Air fryers work by circulating very hot air at high speed around the food, which is brilliant for producing crispy results with less oil. What this also does, however, is blast aerosolised grease particles at considerable velocity around the inside of the appliance – coating the basket, the drawer, the interior walls, and crucially, the heating element above. Each cooking session adds a new layer. Each layer bakes onto the last. Over time, you’re not dealing with grease so much as a compressed archive of every meal you’ve cooked since you bought the thing.

The heating element is the particular villain here. Positioned directly above the food, it catches drips, splatters, and rising grease vapour, and because it reaches extreme temperatures, it effectively carbonises what lands on it. That acrid, slightly smoky smell you’ve started noticing when the air fryer reaches temperature? That’s old, burnt grease on the element re-combusting. It’s not harmful in small quantities, but it’s not doing your food any favours – and it’s a reliable sign that a proper clean is well overdue.


Before You Start – What You’ll Need

The deep clean toolkit for an air fryer is gratifyingly straightforward. Gather the following before you begin: washing-up liquid, bicarbonate of soda, white vinegar, a non-abrasive sponge, an old toothbrush, a soft-bristled brush (a pastry brush works perfectly), a few microfibre cloths, and a small bowl for making a cleaning paste. You’ll also want a basin or sink large enough to soak the removable parts.

What you should absolutely not use: steel wool, abrasive scouring pads, anything metallic to scrape with, or the dishwasher – unless your manual explicitly confirms the components are dishwasher-safe. The non-stick coating on most air fryer baskets is effective and useful right up until the moment it’s scratched off, after which it becomes neither.

Set aside about 40 to 50 minutes in total, the majority of which is hands-off soaking time. Unplug the appliance and allow it to cool completely before you start – this should go without saying, but the enthusiasm for finally tackling the thing can occasionally override common sense.


The Deep Clean – Component by Component

The Basket and Drawer

These are the most heavily soiled parts in virtually every air fryer, and they respond well to a proper soak.

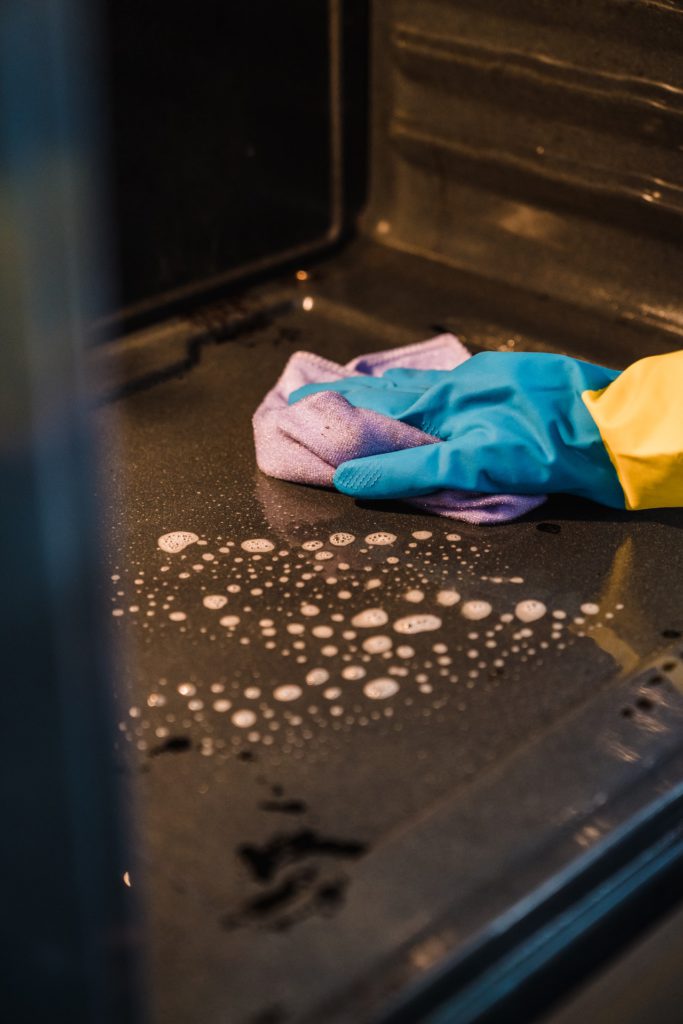
Fill your basin with hot water and a generous squeeze of washing-up liquid, submerge both the basket and the drawer, and leave them for a minimum of 20 minutes. For particularly entrenched grease – the geological variety that prompted this whole exercise – 30 minutes is a better investment. Resist the urge to start scrubbing immediately; the soak is doing the heavy lifting, and working against a softened surface is considerably more effective than attacking a dry one.

Once soaked, work over both components with your non-abrasive sponge using firm, circular motions. The majority of the residue should lift relatively easily at this stage. For the stubborn patches that remain – particularly in the mesh of the basket, where grease compresses into the gaps with impressive determination – switch to your old toothbrush. It reaches where the sponge can’t and gives you the mechanical precision to work individual sections without the risk of scratching.

For anything that still won’t shift after scrubbing, make a paste from bicarbonate of soda and a small amount of water, apply it directly to the affected area, and leave it for ten minutes before returning with the toothbrush. Bicarbonate of soda is mildly abrasive in a way that cuts through carbonised grease without damaging non-stick surfaces – it’s a distinction that matters.

Rinse thoroughly under hot running water, checking that no residue remains in the basket mesh, and set both pieces aside to dry completely on a clean cloth or rack.

The Heating Element

This is the part most people either forget or actively avoid, and it’s usually the part that most needs attention. The heating element lives at the top of the air fryer interior – you’ll see it when you turn the appliance upside down – and it tends to accumulate a dark, carbonised crust that is directly responsible for that burning smell.

With the air fryer unplugged and inverted on a folded towel, use your soft-bristled pastry brush to gently brush away any loose, dry debris from the element first. Be gentle – you’re not trying to dislodge the element itself, just clearing the surface material before introducing any moisture.

Dampen your old toothbrush – not soaking wet, just lightly moistened – with a small amount of washing-up liquid, and carefully work it over the element in short strokes. For heavier carbonised build-up, a bicarbonate of soda paste applied sparingly with the toothbrush and left for five minutes before brushing off will do the job. The key word throughout is gently – you’re cleaning a heating element, not grouting tiles.

Never spray liquid directly onto the heating element and never use the element area as a target for any kind of pour or rinse. A lightly dampened cloth to wipe over afterwards, followed by thorough air drying before the appliance is used again, is the right finish.

The Interior Walls and Exterior

With the big components dealt with, the interior cavity is relatively straightforward. Dip a microfibre cloth in a solution of equal parts white vinegar and warm water, wring it out well so it’s damp rather than wet, and wipe down the interior walls and the inside of the door or lid. Vinegar cuts through greasy residue efficiently and leaves no soapy film behind – important in an appliance where any residue will be heated on the next use.

A cotton bud is quietly invaluable for the corners and the rim where the basket slots in, where grease has a talent for pooling unnoticed and baking into a dark ring over time.

For the exterior, a damp microfibre cloth is all that’s needed for most surfaces. If your air fryer has a digital display panel, go over it carefully with a barely-damp cloth and dry it immediately – moisture and electronics being the combination they are.


The Mistakes That Make Everything Worse

A few common errors are worth flagging explicitly, because they come up repeatedly and the results are dispiriting.

Putting a non-dishwasher-safe basket in the dishwasher – the heat and detergent combination strips non-stick coating with ruthless efficiency, and a basket without its coating becomes a basket that sticks to everything. Soaking the basket in water and then forgetting about it for hours – prolonged submersion can, over time, compromise the coating and the structural integrity of the components. Using harsh chemical degreasers – they work, technically, but many leave residues that you genuinely do not want near food, and they’re unnecessary when bicarbonate of soda and vinegar do the job safely. And perhaps most commonly: cleaning the basket but ignoring the drawer beneath it, where rendered fat quietly collects into a reservoir that contributes significantly to both smell and smoke.


Keeping It from Becoming Geological Again

Prevention here is largely about frequency rather than effort. A quick clean of the basket and drawer after every use – just a hot soapy wash and rinse, two minutes at most – prevents the gradual accumulation that eventually requires the full archaeological excavation. A wipe of the interior walls once a week keeps grease from baking onto the surface over multiple sessions.

Lining the drawer with a piece of tin foil or a dedicated air fryer liner is one of those small moves that makes a disproportionate difference – it catches dripping fat before it can bake on, and it can simply be lifted out and discarded. It doesn’t affect cooking performance, and it makes the weekly wipe-down considerably less eventful.

A monthly check of the heating element – just a visual inspection followed by a light brush if needed – means you’re dealing with fresh deposits rather than carbonised ones, and the whole process takes about three minutes.


When the Grease Has Genuinely Won

If you’ve worked through the full process and the basket’s non-stick coating is cracked, flaking, or peeling – rather than merely discoloured – then cleaning will only take you so far. A damaged coating is worth replacing rather than persevering with, both from a practical standpoint and because ingesting coating fragments is not a culinary direction worth exploring. Replacement baskets are available for most popular models and are far cheaper than a new appliance.

Similarly, if the smell persists after a thorough clean including the heating element, it may indicate that grease has worked its way into areas of the appliance that aren’t user-accessible – around the fan mechanism, for instance. At that point, the most honest assessment is that the appliance has reached the end of its serviceable life, and no amount of bicarbonate of soda is going to change that.

Most of the time, though, it hasn’t. Most of the time, what looks like a write-off is simply a cleaning job that got deferred for a bit too long – and with the right approach, even the most geologically committed grease has a surprisingly short memory.…

Why Your Bathroom Drain Smells Like a Swamp (And the 15-Minute Fix)

26/02/2026 By Jo Off

You’ve cleaned the toilet. You’ve scrubbed the tiles. You’ve bleached the grout to within an inch of its life. The bathroom looks, by any reasonable measure, spotless. And yet. Every time you walk in, there it is – that warm, slightly organic, deeply unpleasant smell that sits somewhere between stagnant pond water and something you’d rather not name (no, this is not a veiled Harry Potter reference). It’s coming from the drain, and it’s making your otherwise clean bathroom feel anything but.

The good news is that a swampy-smelling bathroom drain is almost never a sign of a serious plumbing problem. It’s a sign of a very specific, very fixable build-up that develops in virtually every bathroom in Britain with quiet, unrelenting determination. Better still, you can deal with it in roughly 15 minutes with things you almost certainly already have in your kitchen. Here’s what’s actually going on – and how to sort it.


The Culprit Has a Name, and It’s Genuinely Unpleasant

What you’re smelling is biofilm. It sounds like something from a science fiction film – and in fairness, if you could see it at a microscopic level, it would look the part – but in practice it’s simply a dense colony of bacteria, soap residue, body oils, dead skin cells, and hair that has accumulated on the inner walls of your drain pipe and the underside of your drain cover.

Biofilm is sticky by nature. It starts as a thin, almost invisible coating, and over time it layers up into something altogether more substantial – and more aromatic. Warm, damp conditions accelerate its growth, which is exactly why your bathroom drain is such a hospitable environment for it. Every shower you take washes more organic material into the pipe, and the biofilm, unbothered, keeps building.

The smell itself comes from the metabolic activity of the bacteria in the colony – they’re producing sulphur compounds and other gases as they break down organic matter, which is why the resulting odour has that distinctly swampy, rotten quality. It’s essentially the same process happening in marshland or stagnant water, just in miniature and considerably less picturesque.

If there’s a hair catcher over your drain that hasn’t been cleaned recently, that’s very likely the worst offender. A clump of trapped hair coated in soap scum and body oil is, microbiologically speaking, practically a luxury resort for odour-producing bacteria.


Before You Start – A Quick Sniff Test

Not all drain smells have the same cause, and it’s worth spending thirty seconds ruling out the less common ones before you reach for the bicarbonate of soda.

If the smell is sulphurous – like eggs – and is coming specifically from a drain that hasn’t been used in a while, the issue may simply be a dry P-trap. The P-trap is the curved section of pipe beneath your drain that holds a small amount of water to block sewer gases from travelling upwards into your bathroom. If the drain is in a guest bathroom or a bath you rarely use, that water can evaporate, and sewer gas gets a clear run straight to your nostrils. The fix in that case is genuinely as simple as running the tap for thirty seconds to refill the trap.

If the smell is more sewage-like than swampy, and it’s present throughout the bathroom rather than localised to the drain, that’s a different conversation – one that involves a plumber rather than a cleaning product. But for the overwhelming majority of cases, what you’re dealing with is biofilm, and the 15-minute method below will handle it comprehensively.


The 15-Minute Fix – Step by Step

You will need: bicarbonate of soda, white vinegar, boiling water, an old toothbrush or small cleaning brush, washing-up liquid, and rubber gloves. That’s it.

Step 1 – Remove and clean the drain cover (2 minutes)

Unscrew or unclip the drain cover and take it to the sink. This is usually where the worst of the biofilm is concentrated, and cleaning it separately means you can actually see what you’re doing. Put on your gloves – you’ll be glad you did – and use your old toothbrush with a little washing-up liquid to scrub both sides of the cover thoroughly. Pay particular attention to the underside and any decorative slots or holes where biofilm likes to hide. Rinse under hot water. The improvement in smell just from this step alone is often striking.

If there’s a hair catcher beneath the cover, remove that too, clear it of any trapped hair (this is the least glamorous 45 seconds of the entire process), and give it the same treatment.

Step 2 – Boiling water flush (1 minute)

Carefully pour a full kettle of just-boiled water directly down the drain in a slow, steady stream. This softens and loosens the biofilm coating the upper section of the pipe, making the next steps significantly more effective. Don’t rush this – give the hot water time to do its work as it travels down.

A note for those with older, ceramic-encased pipes: very hot water rather than boiling is the sensible option, just to err on the side of caution.

Step 3 – Bicarbonate of soda (1 minute)

Pour roughly half a cup of bicarbonate of soda directly down the drain. Try to distribute it around the opening rather than just the centre, so it coats the sides of the pipe mouth as it goes down. Leave it for a minute or two to begin working on the residue.

Step 4 – White vinegar (1 minute)

Follow the bicarbonate of soda with an equal amount of white vinegar – about half a cup. The combination will fizz actively, which is doing exactly what you want it to: the reaction creates a mild agitation that lifts biofilm and residue from the pipe walls, while the vinegar’s acetic acid works on grease and organic matter. Leave the whole thing to bubble away for five to seven minutes. You don’t need to do anything during this step. Make a cup of tea.

Step 5 – Final hot water flush (2 minutes)

Once the fizzing has subsided, flush the drain with another kettle of hot water to clear everything you’ve loosened. Pour it slowly and steadily, letting it carry the dislodged material fully down and away from the P-trap section.

Replace the drain cover and hair catcher, and you’re done. Total active time: somewhere between 12 and 15 minutes, depending on how long it takes you to boil the kettle twice.


Why This Works Better Than Bleach

Bleach is the default response for most people when something smells bad in the bathroom, which is understandable – it’s powerful, it’s familiar, and it produces an immediate clean smell that feels reassuring. The problem is that bleach is not particularly effective against biofilm in a drain context. It dilutes rapidly as it travels down the pipe, and while it may temporarily suppress the smell, it doesn’t really break down the underlying build-up. A fortnight later, the swamp is back.

The bicarbonate of soda and vinegar method physically disrupts and lifts the biofilm rather than simply sanitising the surface of it. Paired with the mechanical scrubbing of the drain cover and the loosening effect of the boiling water flush, it’s dealing with the actual source rather than masking it.

For particularly stubborn cases, a follow-up with an enzyme-based drain cleaner – available in most hardware shops – is worth considering. These products contain bacteria and enzymes that continue breaking down organic matter in the pipe over 24 to 48 hours, and they’re considerably less aggressive on pipes and the environment than chemical alternatives.


Keeping the Swamp at Bay – Simple Prevention Habits

Once you’ve done the work, a few regular habits will prevent the biofilm from returning to its former glory.

Clean the drain cover weekly as part of your normal bathroom clean – it takes about a minute and it’s the single most effective preventive step. A monthly bicarbonate and vinegar flush will keep the pipe itself in good order. If you have long hair in the household, a decent hair catcher is worth every penny of the modest investment it represents.

Running hot water for an extra thirty seconds after a shower – rather than turning it off immediately – helps flush residue further down the pipe before it can settle and layer up. Small habit, genuine impact.


When the Smell Isn’t Going Away

If you’ve worked through the full cleaning process and the smell returns within a few days, or if the drain is running slowly as well as smelling, it’s likely that the biofilm build-up extends further down the pipe than the DIY method can comfortably reach. A drain snake or flexible drain cleaning brush – the kind with a long, coiled handle – can extend your reach significantly and is available cheaply from any DIY shop.

Persistent slow drainage combined with smell occasionally indicates a partial blockage deeper in the system, which may warrant a professional drain cleaning. It’s also worth checking whether the smell is exclusively from the drain, or whether it’s present when you run the hot tap as well – the latter can sometimes indicate an issue with a water heater rather than the drain itself.

Most of the time, though, the answer really is 15 minutes, two ingredients from the kitchen cupboard, and an old toothbrush that’s graduated to a new and frankly more important role.…

How to Clean Oven Door Glass Between the Panes When You Can See Years of Grime

02/02/2026 By Jo Off

You can see it. It’s right there. A brownish, greasy haze sitting between the panes of your oven door like a tiny, disgusting aquarium with nothing living in it. You’ve wiped the outer glass. You’ve scrubbed the inner glass. And yet that murky layer of baked-on grease just sits there, completely unbothered, mocking your efforts with the quiet confidence of someone who knows they’re unreachable.

Here’s the good news: they’re not unreachable. You absolutely can clean between the panes of your oven door glass – and you don’t need specialist equipment, a background in appliance repair, or a particularly high pain threshold. This is one of the most searched oven-related questions in Britain, which means you’re in very good company, and the solution is more straightforward than you might think. Here’s exactly how to do it.


Why Does Grime Get Trapped Between Oven Door Glass in the First Place?

Before we get hands-on, it’s worth understanding what you’re actually dealing with – because it changes how you approach the clean.

Most modern oven doors contain two or three panes of glass separated by a narrow cavity. This layered design exists for insulation purposes, keeping the outer surface cooler to the touch while the oven reaches cooking temperature. What the designers also inadvertently created, however, is a perfect little trap for grease.

During cooking, the oven generates steam, grease vapour, and fine particles of splatter. These find their way through small ventilation slots – typically located along the bottom edge of the door – and drift up into the cavity between the panes. Once inside, they cool slightly, condense onto the glass surfaces, and then get baked on during your next roast chicken. Repeat this process over months and years, and you end up with that distinctive brownish haze that no amount of exterior wiping will shift.

Crucially, this isn’t a sign that your oven is broken or that the seal has failed. It happens to virtually every oven eventually, and it’s entirely fixable.


Before You Start – What You’ll Need (and What You Won’t)

One of the most pleasing things about this job is how little specialist kit it actually requires. Here’s what to gather before you begin.

You will need: a couple of microfibre cloths, warm water with a few drops of washing-up liquid, a white vinegar solution (equal parts white vinegar and water in a spray bottle works well), and a long, thin cleaning implement to reach through vent slots if you’re going in without full disassembly. For that last item, a proper flexible cleaning wand is ideal, but a straightened wire coat hanger with a small cloth tied or rubber-banded to the end works remarkably well – Blue Peter would be proud. A flat ruler with cloth taped to it is another solid option. You’ll also want a torch, which most people overlook and then immediately wish they hadn’t.

For stubborn, entrenched grease, bicarbonate of soda mixed into a thin paste is your friend. A dedicated glass cleaner will give you a streak-free finish at the end.

You won’t need: professional cleaning products, abrasive scourers, any kind of heat gun, or prior experience dismantling appliances. Set aside roughly 30 to 60 minutes depending on which method you use and how determined the grime turns out to be.


How to Access the Glass – Disassembly Methods Explained

This is where people tend to lose their nerve, so let’s go through the options clearly, from least to most involved.

Method 1 – Through the Vent Slots (No Disassembly Required)

Most oven doors have a narrow slot or series of small openings along the bottom edge – this is where grease vapour enters, and conveniently, it’s also where your improvised cleaning tool can go in.

Dampen your cloth-tipped implement with your warm soapy water or vinegar solution, feed it carefully through the slot, and work it in slow, side-to-side strokes across the interior glass surface. Here’s where the torch earns its keep: shine it through the glass from the outside so you can actually see the surface you’re cleaning and track your progress. Without it, you’re essentially cleaning blind.

This method works well for light to moderate build-up and requires absolutely no disassembly. Its limitation is reach – depending on your oven’s design, you may not be able to cover the entire glass surface this way.

Method 2 – Removing the Oven Door for Better Access

This sounds far more dramatic than it is. On the vast majority of modern ovens, the door is specifically designed to be removed – usually via a simple hinge-lock mechanism where you flip small clips on both hinges, open the door to a specific angle, and lift it straight off.

With the door removed and laid flat on a towel-covered surface, you suddenly have much better access to those vent slots, and your cleaning tool can reach more of the inner glass. One important note: oven doors are considerably heavier than they look. Having a second person on hand to help lift and manoeuvre is genuinely useful rather than merely cautious.

Check your oven’s manual for the exact hinge-release method for your model – most manufacturers have video guides online, and the whole removal process typically takes about two minutes once you know what you’re doing.

Method 3 – Disassembling the Door Panels Themselves

The most thorough option, and the one to reach for when the grime is truly embedded or when you want a proper, comprehensive clean rather than an improvement. Many oven doors can be unscrewed and the individual panels separated entirely, allowing you to clean each pane of glass as a standalone surface.

Before attempting this, photograph the door from multiple angles – you’ll thank yourself during reassembly. Check your manual or search your oven’s model number on YouTube, where you’ll almost certainly find someone who has done exactly this for your specific appliance. Remove the screws (usually along the top or inner edge of the door frame), gently separate the panels, and clean each glass pane individually with the methods described below. Keep track of any spacers, seals, or trim pieces – they have a way of becoming mysterious by the time you need to put them back.


The Cleaning Process – Getting the Glass Streak-Free and Sparkling

However you’ve gained access, the actual cleaning process follows the same two-stage logic: cut through the grease first, then finish for clarity.

For the first stage, warm water with washing-up liquid will handle moderate grease if you work it in with patience and circular motions. For anything more stubborn – the kind of baked-on residue that’s been there since before you moved in – make a paste from bicarbonate of soda and a small amount of water, apply it to the surface, and leave it to sit for ten to fifteen minutes before working it gently with your cloth. It breaks down grease beautifully without scratching the glass.

Once the grease is lifted, go over the surface with your white vinegar solution and a clean microfibre cloth, using light, circular strokes. This cuts through any soapy residue and leaves the glass genuinely clear rather than just less brown. A dedicated glass cleaner as a final pass will give you that streak-free result that makes the whole job feel worth it.

One point that’s easy to skip over but genuinely matters: make sure everything is completely dry before reassembling. Any moisture trapped between the panes will condense the next time the oven heats up, and you’ll have created the very conditions that cause the problem in the first place.


Putting It All Back Together – Reassembly Tips and Checks

If you removed the door or separated the panels, take reassembly slowly and methodically. Panels go back in the reverse order they came off – which is exactly why that pre-disassembly photograph earns its keep.

Once everything is back in place, run through a quick checklist before you declare victory: the door opens and closes smoothly, the glass doesn’t rattle, and the hinges feel fully engaged rather than sitting slightly proud. If something feels off, don’t force it – consult the manual or pause and revisit rather than pushing on and creating a secondary problem. When it all clicks back together correctly, there is a quietly profound satisfaction in swinging open that door and seeing clean, clear glass looking back at you.


How to Stop the Grime Coming Back (Spoiler: You Can’t Entirely, But You Can Slow It Down)

Some inter-pane grime over time is simply the price of cooking, and no reasonable person should feel defeated by it. That said, a few habits will meaningfully slow the accumulation down.

Wipe the oven door’s interior surface regularly – ideally after each use, once it’s cooled – before grease has a chance to bake on properly. Use an oven liner on the base to catch drips and reduce the amount of splatter vapour circulating. Try not to overfill the oven, as crowded shelves increase internal steam and condensation. If your oven has a self-cleaning pyrolytic cycle, use it periodically – it won’t clean between the panes, but it reduces the overall grease load that contributes to vapour.

With consistent habits, inter-pane cleaning becomes a once-a-year task rather than a mounting source of low-level domestic dread.


When to Call in the Professionals

There are situations where DIY oven glass cleaning becomes genuinely complicated. Very old ovens sometimes have door panels that are sealed rather than removable, leaving the vent-slot method as the only non-destructive option. Damaged or stiff hinge mechanisms can make door removal tricky and occasionally risky. And sometimes – completely reasonably – people simply don’t have the time, the inclination, or the confidence to take apart a kitchen appliance on a Saturday afternoon.

Professional oven cleaners deal with inter-pane grime regularly. It’s a routine part of a thorough oven clean, carried out with the right tools and the model-specific knowledge that comes from having done the job on hundreds of different appliances. There’s no shame in deciding that some jobs are better handed to someone who does them week in, week out – knowing when to delegate is, arguably, one of the more underrated life skills going.…

How To Choose The Best All-round Surfaces For Your Home If You Hate Cleaning

05/01/2026 By Jo Off

Let’s be honest: life in London is far too short to spend it elbow-deep in sugar soap or obsessively buffing a kitchen island. Between the commute, the social life, and the general pace of the city, the “big clean” is often the last thing any of us wants to tackle on a Saturday morning.

As professional cleaners, we see every possible combination of home finishes. We know exactly which materials make a homeowner smile when we arrive, and which ones make our own team sigh with the knowledge of the three-hour scrubbing marathon ahead. The secret to a home that always looks decent—even when you’ve ignored it for a week—isn’t a more expensive vacuum or a magic spray. It is strategic interior design. If you hate cleaning, you need to “design out” the dirt. This guide is your roadmap to choosing all-round surfaces that resist stains, hide dust, and require the absolute bare minimum of elbow grease.


The Science of Low-Maintenance Surfaces

Before we talk about specific materials, we need to understand why some surfaces are harder to clean than others. It usually comes down to three factors: porosity, texture, and how the surface reflects light. When you’re at the showroom, you shouldn’t just be looking at the colour; you should be thinking like a molecular biologist.

Why Smooth and Non-Porous Wins Every Time

The biggest enemy of the “lazy” cleaner is porosity. Natural stones like marble, limestone, and even some granites are effectively like hard sponges. On a microscopic level, they are full of tiny holes. If you spill red wine or drop a bit of turmeric, those pigments seep into the stone itself. Once it’s in there, it’s not coming out without a professional-grade chemical peel.

To avoid this, you want non-porous materials. These are surfaces where the liquid stays on top, waiting for you to casually wipe it away. Engineered materials are almost always better than natural ones in this regard because they are manufactured to be perfectly sealed from the factory.

The Matte vs. Gloss Debate

There is a common misconception that high-gloss surfaces are easier to clean because they are “slick.” While it’s true that dirt doesn’t stick as easily to gloss, the visual reality is the opposite. Gloss acts like a mirror; it highlights every fingerprint, every water spot, and every speck of dust.

In our experience, honed, satin, or “eggshell” finishes are the secret weapon for a low-maintenance home. They provide a smooth enough surface to wipe down easily, but they diffuse light in a way that makes minor imperfections and dust almost invisible to the naked eye.


Kitchen Countertops: The Heavy Lifters

The kitchen worktop is the most abused surface in any home. It faces heat, sharp knives, acidic juices, and heavy pots. If you choose the wrong material here, you’ll spend your life “babysitting” your counters with coasters and specialized pH-neutral cleaners.

Engineered Quartz: The Undisputed Champion

If you ask any professional cleaner what they have in their own home, 90% will say quartz. Unlike natural granite, quartz is made by mixing ground stone with resin. This creates a surface that is incredibly hard and, crucially, completely non-porous. You never have to seal it, it won’t etch when you spill lemon juice on it, and it can handle a bit of rough treatment. For the Londoner who wants the look of marble without the “marble anxiety,” a white quartz with a light grey vein is the ultimate hack. It looks high-end, but it’s essentially bulletproof.

Sintered Stone and Porcelain Slabs

If you want to go a step further, look into sintered stones (like Dekton or Neolith). These are made under such intense heat and pressure that they become almost indestructible. You can literally take a hot pan off the hob and put it directly on the surface, or even use a blowtorch on it, and it won’t mark. Because they are porcelain-based, they are also resistant to UV light and harsh chemicals. They are the “set and forget” option for the modern kitchen.


Flooring That Hides a Multitude of Sins

Flooring covers the most surface area in your home, which means it has the biggest impact on how “clean” the house feels. The goal here is twofold: you want a floor that is easy to mop, but you also want a floor that camouflages the bits of grit and fluff that inevitably accumulate between cleans.

Luxury Vinyl Tile (LVT) and the “Wood Look”

We are huge fans of high-quality LVT (like Karndean or Amtico). Real hardwood is beautiful, but it’s temperamental—it scratches, it hates water, and it requires specialist oils. LVT, on the other hand, is completely waterproof. You can mop it with almost anything, and it’s much “warmer” underfoot than tile.

The trick is to choose a “mid-tone” wood grain with a bit of texture. A very dark floor shows every bit of dust (like a black car), and a very light floor shows every dark hair. A medium oak or walnut finish with a “distressed” grain is incredibly forgiving; it hides crumbs and pet hair like a pro.

The Grout Problem: Large Format Tiles

If you prefer tiles, especially in the kitchen or hallway, the tile itself isn’t the problem—the grout is. Grout is porous, it’s recessed, and it’s a magnet for grey “sludge.”

The solution? Large-format tiles. Instead of 30x30cm tiles, go for 60x120cm or even larger. This drastically reduces the number of grout lines in the room. Furthermore, insist on rectified edges. These are tiles that have been cut perfectly straight, allowing for a tiny 1-2mm grout line. Use an epoxy-based grout rather than a cement-based one, as epoxy is water-resistant and won’t discolour over time.


The Bathroom: Ending the War on Limescale

London is famous for its hard water. That “liquid chalk” builds up on every surface, turning your glass and tiles cloudy within days. To fight this, you need to eliminate the places where water can sit and dry.

Seamless Wall Panels vs. Traditional Tiling

The biggest trend we’re seeing in low-maintenance London homes is the move away from wall tiles in the shower. Instead, people are opting for seamless wall panels or micro-cement. Imagine a shower with zero grout lines. Nothing to scrub with a toothbrush, no place for mould to grow, and a single flat surface that you can squeegee in five seconds. Micro-cement offers a cool, industrial “spa” look that is completely sealed and waterproof. It’s the ultimate “lazy” bathroom hack.

Choosing “Life-Proof” Fixtures

Chrome is the standard for taps and showerheads, but it is a nightmare for water spots. If you don’t wipe a chrome tap every single time you use it, it looks dull.

Instead, consider brushed nickel or brushed brass. These finishes have a “brushed” texture that hides water spots and fingerprints brilliantly. Avoid matte black if you have hard water—the white limescale will show up against the black finish like a beacon.


Cabinetry and Woodwork: Beyond the Surface

When people think of cleaning, they think of horizontal surfaces, but vertical surfaces like kitchen cabinets and skirting boards collect a surprising amount of grease and dust.

Shaker vs. Flat-Panel: The Dust Trap Factor

We all love the classic look of a Shaker-style kitchen, but from a cleaning perspective, that little recessed ledge is a “dust shelf.” Every week, you’ll find a thin line of dust or crumbs sitting in that groove.

If you truly hate cleaning, go for flat-panel (slab) doors. They are a single, smooth surface. A quick wipe from top to bottom and you’re done. Pair this with “push-to-open” mechanisms to eliminate handles, which are another classic grease-trap. If you must have handles, go for simple, rounded pulls that don’t have intricate “nooks and crannies” for kitchen grease to hide in.


Professional Tips for the “Strategic Cleaner”

To wrap up, here is the “cheat sheet” we give to clients who are looking to renovate with a low-maintenance lifestyle in mind.

The “Pattern and Pigment” Rule

  • Avoid Solid Colours: Whether it’s a countertop or a floor, a solid, flat colour (especially pure white or jet black) is your enemy. It shows everything.
  • Embrace “Movement”: Look for materials with “movement”—speckles, veining, or wood grains. These patterns break up the visual field and make it much harder for the eye to spot a stray crumb or a bit of dust.
  • The Mid-Grey Sweet Spot: In the cleaning world, we call mid-grey or “greige” the “disguise colour.” It matches the colour of common household dust almost perfectly. A mid-grey tiled floor can look clean for weeks, even if it hasn’t seen a mop.

The “Wall-Hung” Advantage

If you can, make your furniture and bathroom vanities wall-hung. The easier it is to run a vacuum or a robot mop under a piece of furniture without hitting legs or corners, the more likely you are to actually do it. Keeping the floor clear creates an illusion of cleanliness and makes the physical act of cleaning 50% faster.


Choosing the right surfaces isn’t about being lazy; it’s about being efficient. By picking materials that work with you rather than against you, you can reclaim your time and still enjoy a home that feels fresh and inviting.

Stress-free – Five Pro Tips To Get Your Home Ready For The Holidays And Retain Your Sanity

02/12/2025 By Jo Off

I once stared at my flat on 12 December and realised it looked far closer to a storage unit than a home. I blamed London life, of course. Cold nights, crowded shops, and endless deliveries had turned my hallway into a cardboard canyon. I also had the tiny problem of guests arriving that weekend. My mum rang to remind me she “only needs a tidy corner”, which meant I needed the entire place to sparkle like the lights on Regent Street.

I used to panic every year. My mind raced between cleaning, cooking, wrapping, and trying to keep the cat from wrestling with the tinsel. I tried to juggle everything in one frantic burst, which never worked. My mood collapsed, my home never felt festive enough, and I ended up hiding in the bathroom with a stolen mince pie like a guilty elf.

I reached a point where I had to change something. I wanted calm. I wanted my home to feel warm and inviting. I wanted the holidays to feel less like a survival event and more like… well, the holidays. I stopped chasing perfection and started using five simple tricks that keep my place cheerful without draining my energy.

These are the same tricks I use every December now. They work in tiny London flats, shared houses, and busy family homes. They save you from the annual meltdown and help you enjoy the whole season with your sanity more or less intact.


Clear the Chaos Before the Decorations Come Out

Sort Out the Room Guests Will See First

A home always hits you hardest at the doorway. This is why I tackle the first room anyone steps into. Most London homes don’t give you a sweeping entrance hall. Mine barely gives space for a shoe rack. Still, that tiny patch of floor sets the tone for everything else.

I clear the coat hooks, shake out the doormat, and reset the whole area. My lounge comes next. That’s where guests land. That’s where the tree will go. That’s where stray socks and empty mugs gather like they’re having a team meeting. A quick tidy does wonders. I lift cushions, fold throws, and clear anything that doesn’t belong. I don’t attempt a full deep clean yet. I only aim for a room that feels ready for decorations.

This room becomes my anchor. Once it looks decent, I start to believe the whole house is salvageable.

What To Do With Stuff You Can’t Face Right Now

A home always reveals odd objects this time of year. Last week I found a pair of sunglasses on top of my microwave. I haven’t seen the sun since October, yet there they were.

I don’t waste precious time debating where each thing should go. I give myself a “temporary stash zone”. This zone is not the bed. It is not the bath. It’s a big laundry basket that sits in my bedroom for two days. Anything that makes me think too hard goes in there. Once the holidays calm down, I sort it properly.

This stops the panic spiral. It keeps the house tidy enough for decorations without forcing long decisions on a brain that’s already juggling gift lists and Christmas dinner maths.


Create a Hosting Plan That Doesn’t Break You

Map Out What You Actually Want Your Home To Feel Like

I used to copy every idea I saw online. Full snow-themed tablescapes. Garlands trailing down stair banisters. Enough fairy lights to rival Winter Wonderland. I live in a one-bedroom flat, so all this made the place look like Santa’s grotto had exploded.

These days I choose one vibe. Cosy. Silly. Calm. Bright. Once I decide that, everything else falls into place. A cosy home needs warm lamps, soft blankets, and a few candles. A silly home needs crackers, novelty hats, and snacks within grabbing distance. A calm home needs soft music and clutter tucked out of sight.

I buy only what fits the vibe. This cuts stress in half.

Assign Roles To Family So You Aren’t the Festive Butler

Nothing ruins a holiday faster than feeling like the hired help. I learnt this the year my cousin asked me to “top up the gravy” while I was already elbow-deep in sprouts.

I now assign roles. Kids get jobs like napkin rolling or chocolate distribution. Partners get actual responsibilities, not token gestures. Housemates get the job of keeping drinks stocked. Guests often enjoy helping, so I give them tasks too. One friend loves lighting candles, so she does that every year.

This makes the whole event feel shared, not performed.


Tackle Cleaning in Festive-sized Chunks

The ‘Ten-Minute Dash’ Method

A giant cleaning marathon always feels like punishment. A short burst feels almost fun. I grab a timer, blast a Christmas playlist, and pick one area. Kitchen counters. Coffee table. Carpets in the lounge. I move fast. Ten minutes gives you just enough time to create visual calm.

I do this twice a day in the week before guests arrive. Tea break? Ten-minute dash. Waiting for laundry? Ten-minute dash. You’d be amazed how these tiny sprints stack up. My flat ends up looking tidy without draining me.

Make the Bathroom Guest-ready Without Losing Half a Day

A bathroom always exposes the truth. Guests never say anything, but they always notice. I follow a simple checklist.

Fresh towels go out first. Hand soap gets topped up. The loo seat gets a quick wipe. The mirror gets a fast polish. The bin gets emptied. The sink gets a once-over. I also remove anything vaguely embarrassing. I once forgot about a ridiculous cartoon face mask packet sitting by the taps. My aunt found it very funny. I didn’t.

This whole thing takes ten minutes but gives the impression that I’ve spent far longer.


Sort Food, Drinks, and Supplies Like a Calm Adult (Not a Headless Reindeer)

Stock Up on Items People Always Forget

The holidays always drain certain supplies at record speed. I keep a list in my phone of items that disappear the moment guests step inside: tea, loo roll, bin bags, foil, and batteries. I learnt the battery lesson the hard way. A remote-controlled toy ate six AA batteries in ten minutes last year. Every corner shop near me sells them at the price of a light lunch.

I grab these essentials early. Nothing ruins Christmas Eve like running out of foil while the turkey sits on the counter glaring at you.

Set Up a Drinks and Snack Station To Stop Kitchen Traffic

My kitchen gets crowded the moment guests arrive. People drift in, hover at the doorway, and ask questions like “Do you need a hand?” while blocking the oven. I beat this by creating a drinks station in the lounge. A tray of glasses, a bottle or two, soft drinks, a bowl of nuts, and some chocolates. It becomes the unofficial gathering point. Guests serve themselves. I get space to cook without collisions.

I still remember the year someone swung round too fast and spilled mulled wine centimetres from my cream rug. The drinks station has saved me from a repeat of that nightmare.


Create a Calm Lighting and Scent Setup That Fools Guests Into Thinking You’re Fully in Control

The Magic of Warm Light at Christmas

Fairy lights and lamps hide a multitude of sins. A gentle glow makes clutter less noticeable and instantly lifts a room. I once invited friends over after a long week without cleaning properly. The place looked tired. I switched on warm fairy lights, lit two candles, and dimmed the main light. They walked in and said, “This feels lovely.” I nearly laughed.

Soft light can turn chaos into charm.

Scents That Whisper ‘Festive’ Without Being Overpowering

A home feels far more polished with the right scent. I stick to pine, cinnamon, or a citrus mix. Strong sprays tend to hit people like a wall, and I’ve made that mistake more than once. A gentle scent suggests you’re on top of things even if you hid a mountain of laundry in your bedroom five minutes earlier.

I use a candle in the lounge, a diffuser in the hallway, and that’s enough. Anything more risks smelling like a runaway gingerbread incident.


A Warm, Cheeky Wrap-up

I know London at Christmas can feel wild. Streets glow, shops overflow, buses crawl through rain-soaked evenings, and everyone seems slightly frazzled. A home becomes the one place where you want peace. You want warmth. You want familiar chaos, not the city’s chaos.

These five tricks keep the holiday madness manageable. They give you breathing room. They let you enjoy guests instead of worrying about crumbs or clutter. They help you glide through the season with enough calm left over to enjoy a few treats without feeling guilty.

Your home doesn’t need to be perfect. It only needs to feel welcoming. Once that happens, the whole season opens up and feels softer. You get to sit back, raise a glass, and feel slightly smug that you handled the holidays like a calm adult after all.

The Best Way to Organise and Store Seasonal Decorations

24/01/2025 By Jo Off

Who doesn’t love their Christmas, Halloween, or Easter decorations? They can transform our homes in minutes and infuse the holiday spirit that makes these occasions so special. But let us guess—your idea of properly storing these items is to put them away in a cardboard box (carefully, of course) until next year. What if there was a better, more efficient way to keep your seasonal decorations in pristine condition?

This article offers practical tips on packing and labelling your decorations efficiently, highlighting winter and summer storage strategies. Explore how to maximise space while minimising damage, ensuring your cherished decorations are protected and easily accessible when the next holiday season arrives.

The Importance of Proper Storage

The Importance of Proper Storage

Proper storage is key to keeping your home organised, especially regarding seasonal decorations. Effective storage solutions help you declutter your space and keep your home décor looking great all year round.

By setting up smart organisation systems, you can make the most of your space and easily access your holiday decorations when it’s time to pull them out. Whether you’ve got bins for summer décor or decorative boxes for winter ornaments, the right storage approach will enhance your space’s look and functionality.

Choosing the Right Storage Containers

Regarding storing your seasonal decorations, choosing the right storage containers is crucial for both protection and easy access. Whether you opt for plastic tubs for those fragile items or cardboard boxes for a DIY approach, the proper containers can make a difference in how well your festive decorations stay in shape.

Stackable containers save space and make it easy to grab what you need when the festive season rolls around. You can create an organised system that perfectly fits your style and practical needs by exploring different storage solutions.

Features to Look for in Storage Containers

When selecting storage containers for your seasonal decorations, a few key features can enhance protection and portability. Look for containers made from durable materials that can withstand different climates without allowing mildew or damage to ruin your cherished decor. Consider options with climate control features to keep humidity at bay and protect your items. You’ll want user-friendly and easy-to-transport containers, so swapping out decorations is a doddle.

These essential features keep your items safe and provide peace of mind while in storage. A sturdy construction, for instance, protects your decorations from physical impacts and any potential water exposure, ensuring they remain in great condition for years. Climate control functions like insulated linings or airtight seals can significantly help reduce humidity risks, preventing mould from damaging delicate ornaments.

And don’t forget—the lightweight design of portable containers makes stacking and moving them a breeze, so you can easily organise and access your treasured holiday items when the season comes around.

Efficient Packing Techniques

Tips for Packing and Labeling Decorations

Packing and labelling your seasonal decorations is key to keeping your home organised and making it easy to find what you need when the time comes. By following some clever packing tips, you can keep those delicate ornaments and festive lights safe.

Plus, with a little strategic labelling, you can create a visual inventory of your decorations by season. This practice makes the seasonal switch a doddle and helps you stay in tune with your thematic décor preferences.

Efficient Packing Techniques

Using efficient packing techniques is key, especially when dealing with fragile items like ornaments and wreaths. Grab appropriate wrapping materials like bubble wrap or tissue paper to keep them safe during storage. Pair those with stackable containers to optimise space and minimise damage, making it a breeze to access your festive decorations when it’s time to bring them out.

Taking the time to wrap each item individually reduces the risk of breakage. Tossing in some foam peanuts for extra cushioning inside your containers can further protect those precious festive pieces.

Also, it’s smart to clearly label each box, noting what’s inside and marking any fragile items. This ensures careful handling during transport. This strategic approach boosts efficiency and makes unpacking much easier when you’re ready to set up your decorations again.

So, a solid packing plan can save you time and stress in the long run.

Effective Labeling Strategies

Implementing effective labelling strategies boosts your organisation game for seasonal decorations. By using storage labels and colour-coding according to seasonal themes, you can create a visual inventory that makes it easy to find what you need during your seasonal rotations. This saves you time and enhances the look of your storage spaces.

Using distinct colours for each season—like warm hues for autumn or cool tones for winter—can streamline your search process while adding a fun pop of colour to your storage area. Visual inventories, such as charts or diagrams, can serve as quick references, ensuring everything has its designated spot.

To keep this organised system running smoothly, consider updating labels as the seasons change and regularly decluttering items that no longer match your themes.

This proactive approach will keep your decor fresh and make your storage system a doddle to manage.

Storing Decorations in Different Seasons

Understanding how to store your seasonal decorations is key to keeping them in great shape for future use. Each season comes with its own storage needs.

For instance, winter décor might require climate-controlled storage to protect it from humidity damage, while summer décor can usually be kept in simpler containers. By customising your storage methods to match the seasonal themes of your décor, you’ll ensure everything stays in top condition for when it’s time to showcase them again.

Winter vs. Summer Storage

When comparing winter and summer storage for your decorations, it’s crucial to understand their different needs to keep them in top condition. Winter storage might require some climate control to shield delicate items from moisture, while summer storage is usually more straightforward—focus on protecting against heat and humidity. Knowing these differences can save your seasonal decor from damage and help it last longer.

For example, during those chilly months, using airtight containers to keep any potential dampness at bay is a good idea. Tossing in some silica gel packets can help absorb excess moisture and ensure your wreaths and ornaments stay in great condition.

Conversely, in the sweltering summer, store your items in a cool, dry space away from direct sunlight to prevent fading. Wrapping fragile decorations in acid-free tissue paper adds a nice layer of cushioning and protection against unexpected heat spikes.

By customising your storage methods to fit the seasonal requirements, you can keep your decorations looking vibrant and intact year after year.

Maximising Space and Minimising Damage

Maximising space while keeping your decorations safe is a balancing act that can make a big difference in your home organisation. By using shelving units and stackable containers, you can make the most of the space in your attics, garages, or cupboards while ensuring your fragile decorations are safe and easy to access.

When you implement effective space-saving solutions, you organise your things and protect your cherished decor from potential damage.

Utilising Vertical Space

Utilising vertical space is a clever move that enhances your storage capabilities for seasonal decorations. Adding shelving units allows you to take advantage of that height in your garage or loft, making it easier to access your decor while saving valuable floor space. This approach tidies up your storage and keeps everything organised and within reach.

To make the most of vertical storage, consider installing wall-mounted shelves that can hold bins or boxes filled with your holiday items. Pegboards can also be a fun way to hang lightweight decorations, opening up more surface area for larger pieces. Don’t forget to label your storage bins—this little trick will help you find what you need in no time.

Adjustable shelving can adapt to your changing storage needs over time, giving you the flexibility to store various items. You can turn a cluttered storage area into a functional and efficient space by thoughtfully incorporating these organisational tools.

Protecting Fragile Decorations

Protecting your fragile decorations should be at the top of your storage to-do list. You want to ensure your treasured items stay intact through all those seasonal rotations. Good packing techniques, such as wrapping your items in bubble wrap or tissue paper, can reduce the risk of damage while they’re in storage.

Pairing these methods with solid storage solutions will keep your seasonal décor safe for years.

For example, it’s wise to nest smaller items inside larger ones. This creates a cushioned barrier that minimises movement during transit. Sturdy containers with dividers are also a great idea—they’ll prevent your items from clinking together and risking breakage.

Don’t forget to label each box clearly so you can easily find your holiday treasures without digging through a mountain of containers. By following these best practices, you can create a stress-free storage experience and enjoy your beloved decorations year after year, all without worrying about damage.

The Best Way to Clean Hardwood Floors Without Damaging Them

24/06/2024 By Jo Off

You want your hardwood floors to look classy and last, right? Well, you must make sure you’re cleaning them right. In this article, we’ll discuss the dos and don’ts of cleaning hardwood floors so you can keep them looking gorgeous.

We’ll chat about the common mistakes you should avoid, the products and methods to avoid, and the best way to get those hardwood floors shining. Plus, we’ll hook you up with recommended products and tools, a step-by-step cleaning process, some nifty tips and tricks, and ways to prevent long-term damage. And don’t worry – we’ll show you how to tackle those stubborn stains and spills without wrecking your beautiful floors.

The Importance of Proper Cleaning Techniques

The Importance of Proper Cleaning Techniques

Understanding the importance of proper cleaning techniques for your hardwood floors is critical to keeping them looking their best and lasting longer. If you ignore how you clean them, you could end up causing damage and dulling that lovely shine.

Using the wrong cleaning products or methods is a surefire way to scratch, warp, or stain your hardwood floors, which can seriously diminish their beauty and durability. Keeping up with a regular cleaning routine makes your floors look great and shields them from everyday wear and tear.

Incorporating gentle cleaning habits, like sweeping, dusting, and using the right cleaners, will help you maintain the natural charm of your hardwood floors and ensure they stay a timeless part of your home decor.

Common Mistakes to Avoid

When cleaning hardwood floors, you might make a few common mistakes that can cause serious damage and shorten the lifespan of your beautiful floors.

Products and Methods to Avoid

To keep your hardwood floors looking great, avoid strong chemicals and improper cleaning methods that can damage the surface. Vinegar, ammonia, and harsh cleaners can strip away the protective finish, leaving your floors vulnerable to scratches and water damage.

Stay away from steam mops and excessive water, since they can soak into the wood and cause warping or cupping. Opting for specialised hardwood floor cleaners designed to clean and protect without harming the wood is best.

Choosing the right products and cleaning techniques can keep your hardwood floors looking beautiful and remain strong for years.

Products and Methods to Avoid

The Best Way to Clean Hardwood Floors

To clean hardwood floors effectively, you must know how to care for them. This means using the proper techniques to keep that natural shine and beauty strong for years.

Recommended Products and Tools

When cleaning your hardwood floors, use the right tools and products. For the best results, grab a gentle cleanser, a microfibre mop, and a pH-neutral cleaner.

Give your hardwood floors some TLC with a gentle cleanser specially designed for them. This will help eliminate dirt and grime without any risk of damage.

Team up your cleanser with a microfibre mop to trap pesky dust and debris effectively. And don’t forget to use a pH-neutral cleaner to preserve the finish of your hardwood floors, keeping them shiny and in top shape.

For that extra touch, use a soft cloth for additional cleaning and dusting to ensure your hardwood floors get the gentle care they deserve.

Step-by-Step Cleaning Process

  1. You need to follow a step-by-step cleaning process to keep your hardwood floors in tip-top shape and make sure they stay clean and damage-free.

Tips and Tricks for Effective Cleaning

Regarding keeping your hardwood floors looking spick and span, there are a few essential tips and tricks you’ll want to keep in mind.

First, use gentle, soft-bristled brushes or microfiber cloths when sweeping or dusting. Avoid rough materials that could scratch or harm your beautiful hardwood surface.

Remember to give your floors some regular love with good dusting or vacuuming to prevent dirt and debris from piling up. And when it’s time to mop, remember that less is more. Too much water can spell trouble for your wood floors, leading to warping and damage. Always wring out that mop well and dry those floors quickly to prevent water-related mishaps.

Tips and Tricks for Effective Cleaning

Maintaining and Protecting Hardwood Floors

You must maintain a regular routine to keep your hardwood floors looking their best and standing the test of time. This helps protect the finish and keeps them looking beautiful for years.

Preventative Measures for Long-Term Care

You need to be proactive to maintain your hardwood floors for the long term. This means preventing scratches and minimising damage, especially in high-traffic spots.

A straightforward way to protect your hardwood floors in busy areas is to use furniture pads under heavy pieces like chairs, tables, and sofas. These pads serve as a cushion between the furniture legs and your floor, reducing the chance of scratches from things getting slid or shifted around.

Remember, don’t sweep or hoover your floors regularly to keep dirt and debris at bay. That way, you can avoid those unwanted scratches from a build-up of grit. For an extra layer of protection, consider applying a polyurethane finish. It’ll give your hardwood floors an additional shield against wear and tear, making them last even longer and look as beautiful as ever.

Dealing with Stubborn Stains and Spills

When you’re faced with stubborn stains and spills on your hardwood floors, you’ve got to act quickly and use the correct techniques to prevent any long-term damage and maintain your floors looking their best.

Effective Techniques for Removing Tough Stains

To remove tough stains from your hardwood floors, you must use the proper techniques and avoid harsh chemicals that could damage the surface.

If you spill something, grab a soft cloth and blot it up immediately to stop it from seeping into the wood. Choosing eco-friendly cleaning products isn’t just good for the planet and keeps your floors looking good. DIY solutions like a mix of vinegar and water or a baking soda paste can do wonders on stubborn stains without messing up the hardwood. By avoiding harsh chemicals, you’re making sure your hardwood floors stay beautiful and last a long time.…

Smart Tips For Cleaning Garden Furniture

10/11/2022 By Jo Off
Beautiful garden furniture

The most common choices for garden furniture are chairs and wooden or plastic tables. The reason is that they are practical and inexpensive. You need to clean them regularly from dust and dirt because otherwise, they change colour (especially those of lighter plastic). You probably have a set of garden furniture made of PVC, which is often exposed to various weather conditions, such as sun, wind or rain. Although plastic is relatively easier to maintain, we must pay attention to the material.

So how do you clean garden furniture without damaging it? Here are our professional tips to say “STOP” on stains embedded in the plastic of your outdoor furniture. Following our advice, we promise that your garden will quickly regain the radiance and charm of a bit of paradise.

The main rule is that you should not keep garden furniture in the bright sun for a long time because they are more easily damaged. You can cover them with special covers or decorative pillows.

We rely on natural products for cleaning plastic garden furniture

As you probably know, your outdoor plastic furniture needs precise cleaning after the winter season! In today’s article, we give you some easy and 100% natural tips to give your PVC garden furniture a second life. By following our green tips, you will not only take care of your furniture without damaging it, but you will also do something for our planet and your budget, of course!

Effective cleaning with soapy water and a little white vinegar

If the stains on your furniture are superficial, a mixture of soapy water and white vinegar will be perfectly suitable! Easy to prepare and ideal for your budget, it will give a second youth to your plastic chairs and tables without the risk of damaging them. Use non-abrasive sponges for safe cleaning! Once you remove the stains, be sure to rinse thoroughly with water! Finally, to avoid the appearance of traces of water, dry with a soft towel!

How to clean white plastic garden furniture?

Regarding the exterior decoration of the garden, we often rely on white colour. Why? It is universal, and in tune with the times, this shade brings elegance and sophistication to any room and space! However, it is tough to maintain. So how do you keep and clean white plastic garden furniture? Fragile and exposed to different climatic conditions, your white outdoor furniture tends to lose its lustre. So, to be flawless with time, giving them particular, even natural, care is crucial! For this purpose, a towel soaked in hydrogen peroxide will be perfectly suitable.

The solution against inlaid stains!

If the situation with your garden furniture is dire, the proposal we present to you will certainly work. So, for the most inlaid stains, put baking soda diluted with lukewarm water! Thanks to this clever trick, not a trace will stand you. And to ensure that baking soda will not damage your furniture, put a small amount of the mixture on a limited area, rub, wipe and that’s it!

If you are unsatisfied, combine baking soda with a small amount of oven cleaner. Some outdoor furniture tends to discolour due to its poor quality. So, in this case, cleaning of this type will not work wonders.

White clay stone!

Another green and natural method is clay or silver stone. This paste is very effective in reviving your garden furniture. Apply the clay with a sponge or soft bristles to clean without abrasion. So, moisturise, apply, rub and rinse! Thanks to this revolutionary product, your cleaning becomes child’s play! And as we pointed out above, dry with a soft towel or T-shirt after each rinse.

Egg white – a clever and relatively unknown trick!

Contrary to popular belief, egg white is an excellent method for removing the most stubborn stains! Beat a few egg whites until stiff. Apply the resulting detergent to the desired area or the entire surface of your plastic furniture and let it dry. After half an hour, rub with a towel. That is the simplest and best way to clean garden furniture while making it brighter.

How to clean your wooden set of garden furniture

Plastic garden furniture is light, practical and highly affordable. Although moisture-resistant, plastic sunbeds and chairs often lighten up quickly, especially when exposed to bright sunlight. That is why paying particular attention to their cleaning is essential to increase their service life by at least a few more months. Experienced housewives advise cleaning the garden’s plastic elements with warm water and soap or a solution of hot water and a little soda. The colourful garden furniture is like new with a mixture of half a glass of white vinegar and 1 litre of warm water. With the help of a sponge and baking soda, you can remove all stubborn stains without scratching the surface of the chairs or comfortable plastic deck chairs.

Plastic is waterproof – when it is of high quality. Furniture made of this material is light, but you sweat quickly on chairs without upholstery. Therefore, we recommend that you put on a pillow!
In winter, store them indoors or cover them with waterproof tarpaulin.

Wooden furniture is also an option for garden furniture, but it is more expensive. You can clean this kind of furniture with linseed oil. In addition to linseed oil, beeswax is another suitable option in this case. Creating a protective and durable layer against any stains, this wax will facilitate your next cleaning!
Another option for garden furniture is those made of rattan. It creates a feeling of exoticism and a holiday atmosphere. But it’s a little harder to maintain. You should wipe the top with a soft cloth soaked in a bit of water, and from time to time, it is good to clean the corners between the rods from dust with a vacuum (best if you have a mini vacuum cleaner). Like plastic furniture, keep it under a canopy.

Metal furniture is the most extravagant choice for furnishing the garden or balcony, creating a romantic atmosphere. It is also ideal for vintage decor. Although most metal furniture has a protective coating, it falls off over time, so you should be careful about rust. It is also good to be under an awning or canopy because bird droppings corrode. It is good to repaint them every few years.…

How To Clean The Oven

30/10/2022 By Jo Off

Every appliance in the kitchen that you use often is very dirty and covered with a lot of grease, which is very difficult to clean. That is especially true for ovens, which can be problematic to clean if you need to know some home remedies. The use of household chemicals is not only expensive, but some funds can be harmful to our health.

How do I clean the oven?

It is best to clean the cooker after each cooking, but you may only sometimes have enough time for this purpose so that you can use various home remedies.

Oven cleaning with detergent

One of the advantages of this method is that it is entirely harmless, but also that it is much cheaper compared to household chemicals. Some of the most popular and affordable ways of cleaning the oven are:

  1. Abrasive sponges are an ideal way, as they will deal even with old dirt. Their texture will help you effectively clean your oven, keeping in mind that it is not preferable to use them for the glass part of the stove door because you can damage the surface and scratches remain.
  2. Baking soda is one of the most effective ways to help you easily remove even old greasy stains. At the same time, it neutralises the aroma by simply sprinkling soda on the contaminated areas and then cleaning the oven surface with a sponge. Then leave it on for another hour and wash it.
  3. Vinegar is the most gentle method to clean the oven, even if the surface has an enamel coating. This remedy copes well with oily stains, as well as other contaminants.
  4. Lemon juice can help you in this task. The acid in lemon can easily remove dirt, even if the surface is heavily soiled.
  5. Ordinary soap will deal only with lighter dirt in the oven, and it has completely safe components.
  6. If the stove has an enamel coating, it is easiest to clean it with ordinary steam. You should pour a few glasses of water into the oven tray and add some of the cleaners you have in your home. Then run it at 150 degrees for half an hour, then wipe the surface with a damp cloth.
  7. Vinegar with soda will help you in this task, as hydrogen, released when mixing the two components and the interaction, can remove even the oldest contaminants.
  8. With the help of a bit of ammonia, you can change your oven beyond recognition, as well as clean perfectly tanned surfaces.
  9. Very few people think they can clean different surfaces with ordinary baking powder. In reality, however, it handles even greasy stains and other dirt on the stove perfectly.
  10. Ordinary salt can also become the ideal cleaning agent for the oven. To do this, sprinkle it thoroughly in the oven and then run it at 150 degrees. Wait until the salt turns brown, clean the residue with some cleaning agent (soap solution, dish detergent, etc.), and then wash the residue with a wet towel.

Try to clean the oven often so that it does not get filthy, and to make it easier to remove the dirt, you can preheat it for 15-20 minutes at 50 ° C. If the surface is enamelled, then do not use abrasive sponges.
Dissolve 10-15 tablets of activated charcoal in a glass of water and leave it to act for a few hours so that it will absorb the unpleasant odour. By following these simple and easy rules, you will always be able to clean your oven and make it shine with cleanliness easily.

A super-fast method for cleaning a badly burned oven

How to keep your oven clean.

Cleaning grease that has charred on the sides of the oven is difficult, time-consuming and generally unpleasant. That is the reason why people often postpone it. Unfortunately, there always comes a time when we meet with the impossibility of further procrastination, and we have to take up this activity.

Of course, after a long delay, the oven’s condition is usually such that it would make you straighten your hair or wonder if it’s time for a new stove at home. Such thoughts and feelings would not have occurred to you if there was a quick and easy method to clean badly burned ovens.

Well, there is such a method that is not complicated. What is necessary? Three well-ripened oranges, a packet of baking soda, 300 millilitres of vinegar, and a large glass jar of 500 millilitres.

Preparation

Take the oranges. Peel them. You need their bark. Put them in a jar of 500 millilitres and fill it with apple cider vinegar, leaving a little distance from the cap. Close the container tightly and leave the crusts to stand for five days. Shake the jar at least once a day.

Application

Apply plenty of baking soda to the entire tanned surface of the oven. Take your time. The more soda you apply, the better you will clean. Pour the liquid from the jar into a spray bottle. Then spray the entire oven so that you have wet the soda enough. It will start to bubble and foam.

Cleaning

Wait for this process to dissolve as much fat as possible. It should take at most 20 to 30 minutes. Then, first, remove the foam with a sponge. Clean with a towel. It is guaranteed that after this treatment, the surfaces of your oven will look completely new.

The method is straightforward and has proven its effectiveness. The combined action of vinegar and orange acid quickly dissolves fats, and soda gives your oven a clean and shiny look.…

How To Find Your Cleaning Company?

24/09/2020 By Jo Off

Choose a friendly attitude and professional cleaning solution for your home. We love our job and respect the client’s opinion and desires. Our company can offer you a wide range of services, including zone cleaning and complete solutions for the entire home, the problem zones and commercial buildings.

We are specialized in private home maintenance, business cleaning, museum and other types of social facility washing care. You can rely on our chemical-free carpets, curtains and upholstery purifying because the green and eco-friendly way of working are among our personal and professional philosophies.

Why are our customers delighted with our work?

Cleaning without harmful products and strong scents

  • Fully insured
  • Valuable experience over ten years
  • Money-back guarantee
  • stain removal and protection
  • Rapid and efficient final results
  • Cleaning schedule according to your free time and dynamic routine

Residential cleaning includes:

  • Dusting
  • Mopping
  • Vacuuming
  • Washing
  • Surface cleaning
  • Disinfecting
  • Polishing glass coverings and mirrors

Our responsible cleaning company ensures that everybody receives the highest level of professional service and expertise. We are proud of our efficient work and customer trust.…